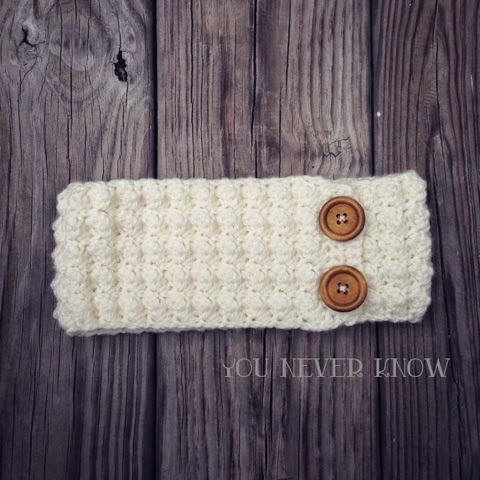
Payton Ear Warmer
Materials:
Worsted Weight Yarn
- I used Hobby Lobby I Love this Yarn
H/ 5mm Hook
Yarn Needle
2 Buttons
Links to Supplies Used:
Clover Amour Complete Set: https://amzn.to/2WSAJdG
Clover Amour Hook H: https://amzn.to/2tg3AuS
Yarn Needles: https://amzn.to/2BsJpyq
Red Heart Super Saver Yarn: https://amzn.to/2SKTwIZ
I love this Yarn: Hobby Lobby
Links to Supplies Used:
Clover Amour Complete Set: https://amzn.to/2WSAJdG
Clover Amour Hook H: https://amzn.to/2tg3AuS
Yarn Needles: https://amzn.to/2BsJpyq
Red Heart Super Saver Yarn: https://amzn.to/2SKTwIZ
I love this Yarn: Hobby Lobby
Stitch Abbreviations:
Sc- single crochet
Hdc - half double crochet
Dc- double crochet
sl st - slip stitch
Ch – chain
Dec- Decrease
Notes:
-
The chain does not count as a stitch.
-
You can adjust the width by adding or
subtracting the beginning chain. Just remember to have a multiple of 3 plus 2.
-
Feel free to add or subtract rows to your
preferred length.
-
To create a nice edge I turn then chain 1
-
Also, Make sure to turn your work the same
direction at the end of each row
-
Approx. size: 3.75” Wide x 22” Long
Ch.17
Row 1: Sc in 2nd chain
from hook and each chain across (16 sts)
Row 2- 61: Turn, Ch.1, (Sc,
2 Dc) in first stitch, * Skip 2 stitches, (Sc, 2 Dc) in next* Repeat 4 times,
Sc in last stitch (16 sts)
Row 62: Turn, Ch.1, Sc dec
in first two stitches, Sc in next 12 stitches, Sc dec in next (14 sts)
Row 63: Turn, Ch.1, Sc in
first two stitches, ch.3, skip next 3 stitches, Sc in next 4 stitches, Ch.3,
Skip next 3 stitches, Sc in last two stitches. (8 sts)
Row 64: Turn, Ch.1, Sc in
first two stitches, 3 Sc in chain space, Sc in next 4 stitches, 3 Sc in chain
space, Sc in next 2 stitches (14 sts)
Fasten off, Weave in Ends.

** This pattern is free and has not been tested. You may make and sell products from this pattern, but if you do I ask that you link back to my post. Please do not copy and post this pattern and claim it as your own. Please do not re-publish the photos as your own. Post may contain affiliate links.**
** This pattern is free and has not been tested. You may make and sell products from this pattern, but if you do I ask that you link back to my post. Please do not copy and post this pattern and claim it as your own. Please do not re-publish the photos as your own. Post may contain affiliate links.**
Comments